
dessert
First-Timer’s Guide to the Perfect 7 Day Utah Itinerary
Last updated on August 29th, 2025 at 08:11 pm
Are you into epic hikes, red rock canyons, and squeezing a few jaw-dropping national parks into just one week? Then buckle up, because my 7 day Utah itinerary was easily one of my favorite U.S. trips ever. And that’s saying a lot since you all know that I rarely travel domestically…let alone write about it. But this 7 day Utah trip? Seriously unforgettable. So here I am, back home, fully committed to sharing all the details (and all the pics) because it was just that good. My South African fiance can attest as well since his jaw was basically to the floor the entire trip.
When it comes to incredible landscapes and hiking opportunities, there’s really nowhere better in the US. Utah is home to the “Mighty Five” national parks: Arches, Bryce Canyon, Canyonlands, Capitol Reef and Zion, and it attracts adventure travelers the world over. It’s a huge landscape, and one you could easily spend a month exploring without getting bored. Full disclosure: we only went to 3 of the 5 but you could easily fit all 5 in if you really wanted to. We just didn’t care that much about Canyonlands or Capitol Reef.

So how do you pack the best of Utah’s national parks into 7 days? Luckily for you, I’m here to help. Below is a detailed guide to the exact trip we (aka my fiancé and I) took, including a day by day breakdown and a list of the hotels and accommodation we used, as well as some of the places we ate and what we thought of them.
Trying to hit all five national parks in just one week? Ambitious but totally doable. You know I’m all about that fast travel life, and this 7 day Utah itinerary packs in a lot without feeling like a race. Keep reading for my exact route, all the best hikes, hotels, and everything I’d recommend to make the most of your Utah adventure.

This site contains affiliate links, which means I may earn a small commission if you make a purchase through them (which will likely go towards overpriced airport wine or buying my dog more unnecessary toys). However, none of that impacts the integrity of my reviews. All thoughts and opinions are my own.
7 Day Utah Itinerary at a Glance
Short on time but planning your own 7 day Utah itinerary? Here’s a quick look at everything you need to know to make it happen 👇
🏨 Hotels: AutoCamp Zion, Bryce Canyon Log Cabins, Gravity Haus Moab
🚗 Getting Around: Rental car (100% necessary)
📅 Trip Length: 7 days
🌤️ Best Time to Go: March to May or September to October
🥾 Vibe: National parks, epic hikes, laid-back restaurants, boutique hotel stays
🧭 Route: Salt Lake → Zion → Bryce Canyon → Moab → Salt Lake
Day 1 of Your 7 Day Utah Itinerary: Salt Lake City to Zion National Park

We started the trip by flying our beloved United Airlines directly into Utah’s capital, Salt Lake City, which is the largest transport hub in the state. You probably already know Salt Lake City as the head of The Church of Jesus Christ of Latter-day Saints, better known as the Mormon Church. Or from the Real Housewives of Salt Lake. Or Mormon Wives. Yes it’s all the same city in Utah 😂
In addition to trashy reality tv, Utah is also known for its prehistoric dinosaur fossils, and one of the best things to do in Salt Lake City is to go on a boat tour around the lake! If you’re interested in the city’s Mormon history then Temple Square and the Salt Lake Temple are obvious highlights, while you can learn about the pioneer movement and the hardy travelers who first settled Utah at the Pioneer Memorial Museum.
As a former flight attendant, we used to lay over in Salt Lake all the time. So we didn’t stop to spend much time here on this particular trip, but if you’ve never been before and you have a spare day or two then you might want to add a night to your itinerary. Just keep in mind they don’t serve alcohol on Sundays so finding a place to grab a drink is far and few in between.
Anyway, back to my arrival from San Francisco! There’s only one way to travel around Utah and it’s by car – public transport is essentially non-existent and the distances you’re going to need to cover are simply too large. Plus, a Utah road trip is one of the more scenic journeys you can make in the USA anyway!
We rented our car directly from the Salt Lake City International Airport. We’ve only got a week, so there’s no time for hanging around!
The first destination of our Utah road trip itinerary was Zion National Park, one of the Mighty Five national parks and the most visited by travelers to Utah. It’s just under a four hour drive (270 miles) from Salt Lake City to Zion National Park. This meant that by the time we arrived at our accommodation in Autocamp Zion (stay tuned for the full scoop on hotels below), it was almost nighttime. We obviously didn’t drive all this way to see nothing so after checking in, we hopped back in the car and headed straight to the Canyon Overlook Trail for sunset.

The Canyon Overlook Trail was about half an hour from the hotel and we did indeed make it for sunset. I definitely recommend you do this, it’s one of the best hikes in Utah at any time of day, but at sunset it’s extra magical. The Canyon Overlook Trail is only 1 mile long, making it a nice route to ease yourself in to all the hiking you’ll be doing on your Utah trip. The path begins with a steep-ish climb up some sandstone steps – there’s a metal handrail to help you if needed. After a short while, the path opens up and ends at the Pipe Creek Canyon Overlook, offering dazzling views into Zion Canyon and a magical vantage point for sunset. Keep your eyes open for bighorn sheep as you hike!
Where to stay on Day 1 of your 7 day Utah itinerary: AutoCamp Zion
Day 2 of Your 7 Day Utah Itinerary: Conquer Angel’s Landing Hike

For our first full day in Zion National Park, we hiked the famous Angels Landing Trail, a round trip distance of just under 5.5 miles that’s widely regarded as one of the best hikes in Zion. This is a more challenging trail than the Canyon Overlook, and a good level of fitness is required. You’ll also need proper footwear and a permit, which you can apply for online. Make sure you do this in advance, as the permits tend to book up.

Angels Landing itself is a towering rock formation standing at 1,488 feet. And the trail leads right to the very top. This means a steep climb, with 1,500 feet of elevation change. If you’re afraid of heights, this may also not be the trail for you – in places the trail, which was hacked into the rock back in 1926, is only a few feet wide. There are handrails in places, and you’ll need to be prepared to yield to other hikers coming down the route, as it’s only wide enough for one person at a time in places.
Guys I swear the switchbacks on this trail killed me. It probably took 45 minutes just to go 0.25mile at some points but the views were totally worth it. At the end of the trail, the path widens and there’s enough room to sit, rest and take in the panoramic views from the top. You’ll be able to enjoy panoramas of Zion Canyon and capture some awesome photos before heading back down.

We were absolutely done for after the hike and spent the rest of our second day chilling by the pool with a book and a cocktail – because duh, what else are you going to reward yourself with after the hardest hike of your life? But if you prefer to take on a second trail in the afternoon, some of the other shorter routes I’d look into are the Water Canyon Trail (2 mile round trip), the much quieter Northgate Peaks (4.4 miles round trip) or the paved Pa’rus Trail, one of the easiest and most accessible routes in Zion National Park (3.5 mile round trip). Or you can sit by the pool with a drink, like me 🍹

In the evening, we headed out for dinner at Stagecoach Grille & Saloon in the nearby town of La Verkin. This locally-owned, old school steakhouse uses fresh ingredients sourced exclusively from nearby businesses. You could really taste this quality and freshness – we left very full and happy. Definitely a great stop on any Utah roadtrip!
Where to stay on Day 2 of your 7 day Utah itinerary: AutoCamp Zion
Day 3 of Your 7 Day Utah Itinerary: Hike the Watchman Trail

Rise and shine! We literally have not slept in the entire trip but that’s okay. It was July anyway so we basically had to get up early to beat the sun which was fine since I’m an early bird. Day 3 was our final day in Zion National Park, so we set out to tackle another of the best hikes in Zion. This time, it was the Watchman Trail, a 3.3 mile roundtrip route which is relatively easy to complete, with an elevation gain of just over 400 feet. It’s tucked away on the edge of the national park and is generally a lot quieter than some of the more popular routes like Angels Landing.

While the trail is short and sweet (in my perspective), the Watchman Trail is pretty exposed, with only a little bit of shade offered by patches of evergreen trees, so make sure you take plenty of water and sunblock with you. The trail is also known to have clusters of prickly pear cactus, which are beautiful to look at, but make sure you keep an eye on children and watch your footing when walking by.
To reach the trailhead, you’ll want to head to the Zion Canyon Visitor Center and then make your way along the river.

After the hike, we went back to Autocamp to chill for a bit before heading to drinks and dinner at the Zion Canyon Brew Pub in Springdale. As the name suggests, there’s an onsite brewery here and apparently it’s Utah’s first craft brewery. We ordered flights of beers and treated ourselves to some hearty food as a reward for all the mileage we covered over the last few days. The menu is typical pub grub, from fish and chips to burgers and even British-style bangers and mash. It was just what we needed!
Where to stay on Day 3 of your 7 day Utah itinerary: AutoCamp Zion
Day 4 of Your 7 Day Utah Itinerary: Travel from Zion to Bryce Canyon

There’s no rest for the wicked (and on this Utah trip) because we were up early on day 4 of our 7 day Utah itinerary to head to Bryce Canyon National Park! From Zion, it’s about an ~83 mile, 2 hour drive which I happily played passenger princess for.
One thing to note during this stretch of the Utah road trip is that there aren’t many gas stations along the way. We were pretty shocked and happy we filled up for gas in Zion so just keep that in mind if you’re following our exact route. Make sure you have a full tank in Zion in case there isn’t anywhere to stop!
Once we got to Bryce Canyon, we checked into our cute little hotel called Bryce Canyon Log Cabins in Tropic and immediately headed out for the park.

If you’re looking for easy hikes in Utah, then the Queen’s Garden Trail is widely regarded as Bryce Canyon National Park’s easiest trail, and is an especially good option if you’re a bit older or not as fit as you used to be. You can choose to complete this 1.8 mile round trip trail on its own, or do what I did which is to combine it with the 1.5 mile Navajo Loop. This combination hike is one of the best hikes in Utah and the most popular in the national park, taking between 2 – 3 hours to complete.

The total combined distance is 2.9 miles, with approximately 625 feet of elevation change, so nothing too difficult. The trail begins at Sunrise Point, and you’ll enjoy amazing views of the Bryce Amphitheater before you reach the iconic Queen Victoria hoodoo. It’s this rock formation that gives the Queen’s Garden Trail its name, and is said to resemble the former British monarch on her throne.

From the hoodoo, the trail connects with the Navajo Loop, and you’ll need to decide whether to take the Two Bridges path or the Wall Street option. As the name suggests, Two Bridges offers up some great photo opportunities of two natural rock bridges, whilst the Wall Street path takes you through a narrow slot canyon – it’s usually closed in the winter, just so you’re aware! The trail ends with a pretty flat walk back to Sunrise Point.

Call me crazy because instead of heading back to our hotel, we actually decided to embark on another trail known as the lesser-visited Hat Shop Trail. This 4 mile route includes nearly 1,400 feet of elevation change – while tough in some areas, it was definitely one of the coolest hikes in Utah that we completed. I also loved that it wasn’t crowded at all so we barely saw any people along the way.

Well after a full day of hiking, we were starving and getting hangry with each other so we popped into Rustler’s Restaurant near our hotel for some good ole-fashioned burgers and steaks. To say that we slept like babies that night is an understatement 🥩
Where to stay on Day 4 of your 7 day Utah itinerary: Bryce Canyon Log Cabins
Day 5 of Your 7 Day Utah Itinerary: Drive to Moab & Explore Arches National Park

And on the 5th day of our 7 day Utah road trip, we headed to the third and final national park of our itinerary: Arches National Park. Some of you might be wondering why we chose Arches instead of Canyonlands or Capitol Reef and my reasoning is two-fold:
#1 Logistically, it just kinda makes sense. From Salt Lake City to Zion to Bryce Canyon to Arches takes you in an almost loop, with the journey back to Salt Lake City from Moab (gateway to Arches National Park) essentially just a 233 mile straight line. Capitol Reef is the most remote of the five parks, and Canyonlands sprawls out for miles along the Colorado River. For efficiency, and to get the most from our 7 days in Utah, it just kinda made sense to skip these two. Zion and Bryce Canyon in particular, are the easiest two to combine as they are (relatively speaking) so close together.
#2 Aesthetically, because duh that matters to me. This is a travel blog after all which means hopefully anyone reading this likes to see pretty things like I do! And Zion, Bryce Canyon and Arches give you the best diversity of landscapes. Zion National Park is home to towering cliffs and narrow canyons, Bryce Canyon National Park is home to those iconic hoodoos while Arches National Park has the most iconic… arches 😂 These three parks cover all the main landscapes in Utah and there’s not too much extra to be gained from the other two parks.
So with all this in mind, we headed away from Tropic and Bryce Canyon National Park and made the ~4 hour drive to Moab, one of our last (and favorite stops) on this 7 day Utah roadtrip! We checked in to Gravity Haus Moab and then headed straight out for our first hike… which was surprisingly not in Arches National Park!
I feel like we totally stumbled upon a hidden gem though which was great. Our only mistake was hiking this at 12pm in the middle of July so don’t be stupid like us & try to go earlier or later during the day 🥵

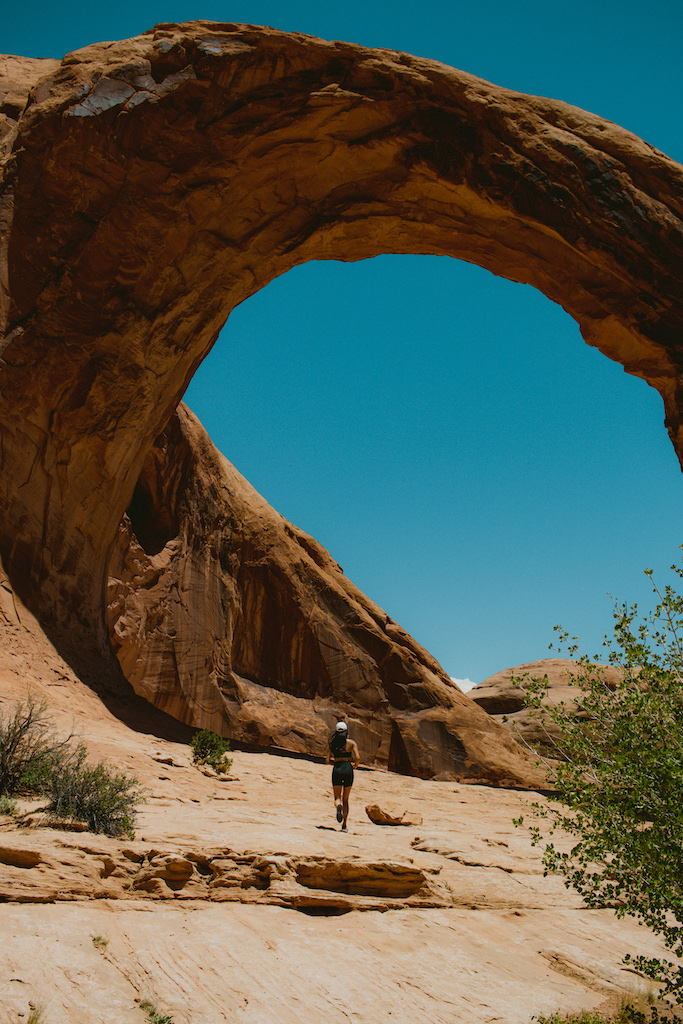
The Corona Arch Trail (main cover photo of this post) is a 3-mile hike with little elevation change to one of the most spectacular arches in the area, and the trailhead is located right outside Moab.
You’ll have to cross some railroad tracks (be careful!) before you pass a couple of smaller arches as you hike: first Pinto Arch and then Bowtie Arch before you reach the biggest of them all: Corona Arch.
Made from Navajo sandstone, this natural landmark stretches 140 feet across and is more than 100 feet high. You can lie directly underneath the arch to get a sense of its proportions (this makes good photos too!).

The main reason to complete this hike and reach Corona Arch during your Utah itinerary has to do with it lying outside Arches National Park. There was seriously nobody there!
Tourists flock to the national parks, of course, but Corona Arch is definitely an underrated trail. We passed a few other hikers along the route, but compared to some of the other trails on our trip, this was one of the quietest and well worth the hike.

After all the hiking and taking an ice cold shower, we decided to head out to Downtown Moab. Which is a cute little one-road town with a bunch of shops and restaurants. We got dinner that night at the Moab Food Truck Park, an outdoor food court with shaded seating. This social hub was a great place to end our first night in Moab. There are a whopping 14 food trucks to choose from at the park, offering everything from Chinese and Italian pizza to Mexican tacos, sushi. You can even wash your dinner down with a snow cone like I did.
Where to stay on Day 5 of your 7 day Utah itinerary: Gravity Haus Moab
Day 6 of Your 7 Day Utah Itinerary: Full Day Exploring Arches National Park

For our last full day of our 7 day Utah itinerary, we knew we had to make the most of Arches National Park. This was a biiiiig day of hiking for us. We started at the Delicate Arch Trail, which is probably the most iconic of the hikes in Arches – Delicate Arch is the one you see in all the social media posts and on travel websites.
The highlight of this 3-mile round trip is definitely Delicate Arch itself! You don’t get your first glimpse of Delicate Arch until right at the end of the trail. Which also means you’ll need to SPRINT to the Arch to get a good view of it without the people. (Although with the “remove people” feature that the iphone has these days, that isn’t really a problem anymore).
Next up is the ~7.7 mile Devil’s Garden Trail. This a much longer hike but one that reveals seven incredible arches along its route. The first part of the trail, to Landscape Arch is pretty easy, but things got a bit tougher after this, which also meant the crowds thinned out.

We knew that 7 miles would be pretty tough for us especially on the last day of our trip so we made it to the Double O Arch (which as you can guess, is a double arch) before turning back. We also drove around to some of the viewpoints inside Arches and walked along the paved trails before exiting around sunset.

Back in Moab, the final dinner of our trip was at Josie Wyatts Grille, a modern steak house that’s also open for breakfast. Along with a delicious burger, we enjoyed a couple of cocktails on the outside terrace, which was a great way to round off our last week in Utah.
Where to stay on Day 6 of your 7 day Utah itinerary: Gravity Haus Moab
Day 7 of Your 7 Day Utah Itinerary: Colorado River Kayaking & Heading Home

Aaaand we made it to the final day of this epic 7 day Utah itinerary!
And like the crazy travelers we are, we actually managed to fit in one last activity before heading back to Salt Lake to catch our flight. Can you guess what it was?? And no it’s not hiking!
Moab sits right along the Colorado River, making it an ideal spot for a rafting adventure! So naturally, we signed up for one. Per usual, we booked the activity through GetYourGuide and joined a group tour on the river. It was an absolute blast. I barely paddled (shoutout to my fiance for doing the heavy lifting), but loved taking pics along the way, soaking in the scenery, and enjoying the ride.
The whole adventure lasted about ~4 hours. Afterwards, we headed straight back to Salt Lake, dropped off the rental car and hopped on our 8pm flight back to SF.
Best Hotels and Places to Stay in Utah

I was considering leaving out this section but couldn’t resist giving you more background on where we stayed! This trip actually took place prior to my full-blown travel blogging days so I didn’t capture as much as I typically would now. But I hope you still find it useful since I know finding clean, quiet, hotels anywhere in the world can be difficult.
So here’s a brief summary of the three places we stayed during my 7 day Utah itinerary. Each hotel was clean, comfortable and super well-located (location is key for me), and I’m happy to recommend all three if you’re looking for somewhere to stay in and around the main national parks.
Autocamp Zion

Cute airstreams with unforgettable views? Yep, that’s basically the entire Autocamp brand for you. And there’s loads of different options at Autocamp Zion. You can stay in idyllic little cabins, permanent tents or airstream suites, each equipped with modern amenities and outdoor space. The resort hosts its own hikes and tours, offers E-bike and mountain bike rentals and tours, and can even take you out canyoning or mountaineering. They very also offer a packaged breakfast option if you’re looking to get up and out nice and early, there’s an onsite General Store and The Kitchen restaurant is the perfect place to return to after a day of hiking, offering breakfast, lunch and dinner, plus a well-stocked bar.
Rooms here typically start at $180/night.
Bryce Canyon Log Cabins

Can you tell I picked the hotels based off two things? Aesthetic and location! And Bryce Canyon Log Cabins definitely delivered on both.
These cozy cabins easily took the top spot out of all the places we stayed. Each cabin came with a comfy queen or king bed, free Wi-Fi, and a private bathroom with both a shower and a bath aka post-hike recovery heaven. We also loved having our own outdoor veranda to chill on, plus communal BBQs if you’re feeling grill-happy. It’s just outside the town of Tropic, so you’re close to all the bars, shops, and restaurants without being right in the middle of it.
Rooms here typically start at $140/night.
Gravity Haus Moab

Gravity Haus Moab is one of the best hotels in Moab and was definitely the most modern out of the three. With sweeping red rock views and a prime downtown Moab location, this resort nails both the scenery and the convenience. The rooms are sleek, spacious, quiet, and clean. (Seriously, what more could you ask for). Sadly we didn’t bring Bagel but it’s good to know that Gravity Haus is also dog-friendly. You can even rent hiking equipment on site and chat with their guides about your trip plans… though I’m willing to bet their Utah itinerary won’t beat mine 😊
Rooms here typically start at $130/night.
The Best 7 Day Utah Itinerary: Final Thoughts

Like I said at the top of this post, the fact that I’m even writing about a domestic destination says a lot. I pretty much only travel internationally or write about California wine country, but Utah? Utah earned its own corner of my heart. This trip reminded me how lucky we are to move our bodies, breathe in fresh air, and witness the unreal beauty that exists right here at home. (Sappy I know but it’s true).
If you’re someone who loves staying active, it’s no question: Utah is one of the best hiking destinations in the U.S. You could easily spend a month here and still not hit every trail or viewpoint. But a 7 day Utah itinerary? That’s the sweet spot. It gives you enough time to explore a few of the top national parks, take on some legit hikes, and still have your evenings to chill.
This 7 day Utah itinerary was such a good reminder to slow down, soak it all in, and appreciate feeling happy and healthy. I don’t know when we’ll be back, but I really hope it’s soon. Until then, I’ll be recommending this 7 day Utah itinerary to everyone who asks.
Are you planning a trip to Utah anytime soon? Did I miss any of the coolest hikes in Utah that I need to tackle next time? Let me know in the comments below!
Visiting other parts of America?
Check out my other travel guides on The United States here.
Looking for travel inspiration to somewhere else?
Last updated on August 29th, 2025 at 08:11 pm
Are you into epic hikes, red rock canyons, and squeezing a few jaw-dropping national parks into just one week? Then buckle up, because my 7 day Utah itinerary was easily one of my favorite U.S. trips ever. And that’s saying a lot since you all know that I rarely travel domestically…let alone write about it. But this 7 day Utah trip? Seriously unforgettable. So here I am, back home, fully committed to sharing all the details (and all the pics) because it was just that good. My South African fiance can attest as well since his jaw was basically to the floor the entire trip.
When it comes to incredible landscapes and hiking opportunities, there’s really nowhere better in the US. Utah is home to the “Mighty Five” national parks: Arches, Bryce Canyon, Canyonlands, Capitol Reef and Zion, and it attracts adventure travelers the world over. It’s a huge landscape, and one you could easily spend a month exploring without getting bored. Full disclosure: we only went to 3 of the 5 but you could easily fit all 5 in if you really wanted to. We just didn’t care that much about Canyonlands or Capitol Reef.
So how do you pack the best of Utah’s national parks into 7 days? Luckily for you, I’m here to help. Below is a detailed guide to the exact trip we (aka my fiancé and I) took, including a day by day breakdown and a list of the hotels and accommodation we used, as well as some of the places we ate and what we thought of them.
Trying to hit all five national parks in just one week? Ambitious but totally doable. You know I’m all about that fast travel life, and this 7 day Utah itinerary packs in a lot without feeling like a race. Keep reading for my exact route, all the best hikes, hotels, and everything I’d recommend to make the most of your Utah adventure.
This site contains affiliate links, which means I may earn a small commission if you make a purchase through them (which will likely go towards overpriced airport wine or buying my dog more unnecessary toys). However, none of that impacts the integrity of my reviews. All thoughts and opinions are my own.
7 Day Utah Itinerary at a Glance
Short on time but planning your own 7 day Utah itinerary? Here’s a quick look at everything you need to know to make it happen 👇
🏨 Hotels: AutoCamp Zion, Bryce Canyon Log Cabins, Gravity Haus Moab
🚗 Getting Around: Rental car (100% necessary)
📅 Trip Length: 7 days
🌤️ Best Time to Go: March to May or September to October
🥾 Vibe: National parks, epic hikes, laid-back restaurants, boutique hotel stays
🧭 Route: Salt Lake → Zion → Bryce Canyon → Moab → Salt Lake
Day 1 of Your 7 Day Utah Itinerary: Salt Lake City to Zion National Park
We started the trip by flying our beloved United Airlines directly into Utah’s capital, Salt Lake City, which is the largest transport hub in the state. You probably already know Salt Lake City as the head of The Church of Jesus Christ of Latter-day Saints, better known as the Mormon Church. Or from the Real Housewives of Salt Lake. Or Mormon Wives. Yes it’s all the same city in Utah 😂
In addition to trashy reality tv, Utah is also known for its prehistoric dinosaur fossils, and one of the best things to do in Salt Lake City is to go on a boat tour around the lake! If you’re interested in the city’s Mormon history then Temple Square and the Salt Lake Temple are obvious highlights, while you can learn about the pioneer movement and the hardy travelers who first settled Utah at the Pioneer Memorial Museum.
As a former flight attendant, we used to lay over in Salt Lake all the time. So we didn’t stop to spend much time here on this particular trip, but if you’ve never been before and you have a spare day or two then you might want to add a night to your itinerary. Just keep in mind they don’t serve alcohol on Sundays so finding a place to grab a drink is far and few in between.
Anyway, back to my arrival from San Francisco! There’s only one way to travel around Utah and it’s by car – public transport is essentially non-existent and the distances you’re going to need to cover are simply too large. Plus, a Utah road trip is one of the more scenic journeys you can make in the USA anyway!
We rented our car directly from the Salt Lake City International Airport. We’ve only got a week, so there’s no time for hanging around!
The first destination of our Utah road trip itinerary was Zion National Park, one of the Mighty Five national parks and the most visited by travelers to Utah. It’s just under a four hour drive (270 miles) from Salt Lake City to Zion National Park. This meant that by the time we arrived at our accommodation in Autocamp Zion (stay tuned for the full scoop on hotels below), it was almost nighttime. We obviously didn’t drive all this way to see nothing so after checking in, we hopped back in the car and headed straight to the Canyon Overlook Trail for sunset.
The Canyon Overlook Trail was about half an hour from the hotel and we did indeed make it for sunset. I definitely recommend you do this, it’s one of the best hikes in Utah at any time of day, but at sunset it’s extra magical. The Canyon Overlook Trail is only 1 mile long, making it a nice route to ease yourself in to all the hiking you’ll be doing on your Utah trip. The path begins with a steep-ish climb up some sandstone steps – there’s a metal handrail to help you if needed. After a short while, the path opens up and ends at the Pipe Creek Canyon Overlook, offering dazzling views into Zion Canyon and a magical vantage point for sunset. Keep your eyes open for bighorn sheep as you hike!
Where to stay on Day 1 of your 7 day Utah itinerary: AutoCamp Zion
Day 2 of Your 7 Day Utah Itinerary: Conquer Angel’s Landing Hike
For our first full day in Zion National Park, we hiked the famous Angels Landing Trail, a round trip distance of just under 5.5 miles that’s widely regarded as one of the best hikes in Zion. This is a more challenging trail than the Canyon Overlook, and a good level of fitness is required. You’ll also need proper footwear and a permit, which you can apply for online. Make sure you do this in advance, as the permits tend to book up.
Angels Landing itself is a towering rock formation standing at 1,488 feet. And the trail leads right to the very top. This means a steep climb, with 1,500 feet of elevation change. If you’re afraid of heights, this may also not be the trail for you – in places the trail, which was hacked into the rock back in 1926, is only a few feet wide. There are handrails in places, and you’ll need to be prepared to yield to other hikers coming down the route, as it’s only wide enough for one person at a time in places.
Guys I swear the switchbacks on this trail killed me. It probably took 45 minutes just to go 0.25mile at some points but the views were totally worth it. At the end of the trail, the path widens and there’s enough room to sit, rest and take in the panoramic views from the top. You’ll be able to enjoy panoramas of Zion Canyon and capture some awesome photos before heading back down.
We were absolutely done for after the hike and spent the rest of our second day chilling by the pool with a book and a cocktail – because duh, what else are you going to reward yourself with after the hardest hike of your life? But if you prefer to take on a second trail in the afternoon, some of the other shorter routes I’d look into are the Water Canyon Trail (2 mile round trip), the much quieter Northgate Peaks (4.4 miles round trip) or the paved Pa’rus Trail, one of the easiest and most accessible routes in Zion National Park (3.5 mile round trip). Or you can sit by the pool with a drink, like me 🍹
In the evening, we headed out for dinner at Stagecoach Grille & Saloon in the nearby town of La Verkin. This locally-owned, old school steakhouse uses fresh ingredients sourced exclusively from nearby businesses. You could really taste this quality and freshness – we left very full and happy. Definitely a great stop on any Utah roadtrip!
Where to stay on Day 2 of your 7 day Utah itinerary: AutoCamp Zion
Day 3 of Your 7 Day Utah Itinerary: Hike the Watchman Trail
Rise and shine! We literally have not slept in the entire trip but that’s okay. It was July anyway so we basically had to get up early to beat the sun which was fine since I’m an early bird. Day 3 was our final day in Zion National Park, so we set out to tackle another of the best hikes in Zion. This time, it was the Watchman Trail, a 3.3 mile roundtrip route which is relatively easy to complete, with an elevation gain of just over 400 feet. It’s tucked away on the edge of the national park and is generally a lot quieter than some of the more popular routes like Angels Landing.
While the trail is short and sweet (in my perspective), the Watchman Trail is pretty exposed, with only a little bit of shade offered by patches of evergreen trees, so make sure you take plenty of water and sunblock with you. The trail is also known to have clusters of prickly pear cactus, which are beautiful to look at, but make sure you keep an eye on children and watch your footing when walking by.
To reach the trailhead, you’ll want to head to the Zion Canyon Visitor Center and then make your way along the river.
After the hike, we went back to Autocamp to chill for a bit before heading to drinks and dinner at the Zion Canyon Brew Pub in Springdale. As the name suggests, there’s an onsite brewery here and apparently it’s Utah’s first craft brewery. We ordered flights of beers and treated ourselves to some hearty food as a reward for all the mileage we covered over the last few days. The menu is typical pub grub, from fish and chips to burgers and even British-style bangers and mash. It was just what we needed!
Where to stay on Day 3 of your 7 day Utah itinerary: AutoCamp Zion
Day 4 of Your 7 Day Utah Itinerary: Travel from Zion to Bryce Canyon
There’s no rest for the wicked (and on this Utah trip) because we were up early on day 4 of our 7 day Utah itinerary to head to Bryce Canyon National Park! From Zion, it’s about an ~83 mile, 2 hour drive which I happily played passenger princess for.
One thing to note during this stretch of the Utah road trip is that there aren’t many gas stations along the way. We were pretty shocked and happy we filled up for gas in Zion so just keep that in mind if you’re following our exact route. Make sure you have a full tank in Zion in case there isn’t anywhere to stop!
Once we got to Bryce Canyon, we checked into our cute little hotel called Bryce Canyon Log Cabins in Tropic and immediately headed out for the park.
If you’re looking for easy hikes in Utah, then the Queen’s Garden Trail is widely regarded as Bryce Canyon National Park’s easiest trail, and is an especially good option if you’re a bit older or not as fit as you used to be. You can choose to complete this 1.8 mile round trip trail on its own, or do what I did which is to combine it with the 1.5 mile Navajo Loop. This combination hike is one of the best hikes in Utah and the most popular in the national park, taking between 2 – 3 hours to complete.
The total combined distance is 2.9 miles, with approximately 625 feet of elevation change, so nothing too difficult. The trail begins at Sunrise Point, and you’ll enjoy amazing views of the Bryce Amphitheater before you reach the iconic Queen Victoria hoodoo. It’s this rock formation that gives the Queen’s Garden Trail its name, and is said to resemble the former British monarch on her throne.
From the hoodoo, the trail connects with the Navajo Loop, and you’ll need to decide whether to take the Two Bridges path or the Wall Street option. As the name suggests, Two Bridges offers up some great photo opportunities of two natural rock bridges, whilst the Wall Street path takes you through a narrow slot canyon – it’s usually closed in the winter, just so you’re aware! The trail ends with a pretty flat walk back to Sunrise Point.
Call me crazy because instead of heading back to our hotel, we actually decided to embark on another trail known as the lesser-visited Hat Shop Trail. This 4 mile route includes nearly 1,400 feet of elevation change – while tough in some areas, it was definitely one of the coolest hikes in Utah that we completed. I also loved that it wasn’t crowded at all so we barely saw any people along the way.
Well after a full day of hiking, we were starving and getting hangry with each other so we popped into Rustler’s Restaurant near our hotel for some good ole-fashioned burgers and steaks. To say that we slept like babies that night is an understatement 🥩
Where to stay on Day 4 of your 7 day Utah itinerary: Bryce Canyon Log Cabins
Day 5 of Your 7 Day Utah Itinerary: Drive to Moab & Explore Arches National Park
And on the 5th day of our 7 day Utah road trip, we headed to the third and final national park of our itinerary: Arches National Park. Some of you might be wondering why we chose Arches instead of Canyonlands or Capitol Reef and my reasoning is two-fold:
#1 Logistically, it just kinda makes sense. From Salt Lake City to Zion to Bryce Canyon to Arches takes you in an almost loop, with the journey back to Salt Lake City from Moab (gateway to Arches National Park) essentially just a 233 mile straight line. Capitol Reef is the most remote of the five parks, and Canyonlands sprawls out for miles along the Colorado River. For efficiency, and to get the most from our 7 days in Utah, it just kinda made sense to skip these two. Zion and Bryce Canyon in particular, are the easiest two to combine as they are (relatively speaking) so close together.
#2 Aesthetically, because duh that matters to me. This is a travel blog after all which means hopefully anyone reading this likes to see pretty things like I do! And Zion, Bryce Canyon and Arches give you the best diversity of landscapes. Zion National Park is home to towering cliffs and narrow canyons, Bryce Canyon National Park is home to those iconic hoodoos while Arches National Park has the most iconic… arches 😂 These three parks cover all the main landscapes in Utah and there’s not too much extra to be gained from the other two parks.
So with all this in mind, we headed away from Tropic and Bryce Canyon National Park and made the ~4 hour drive to Moab, one of our last (and favorite stops) on this 7 day Utah roadtrip! We checked in to Gravity Haus Moab and then headed straight out for our first hike… which was surprisingly not in Arches National Park!
I feel like we totally stumbled upon a hidden gem though which was great. Our only mistake was hiking this at 12pm in the middle of July so don’t be stupid like us & try to go earlier or later during the day 🥵
The Corona Arch Trail (main cover photo of this post) is a 3-mile hike with little elevation change to one of the most spectacular arches in the area, and the trailhead is located right outside Moab.
You’ll have to cross some railroad tracks (be careful!) before you pass a couple of smaller arches as you hike: first Pinto Arch and then Bowtie Arch before you reach the biggest of them all: Corona Arch.
Made from Navajo sandstone, this natural landmark stretches 140 feet across and is more than 100 feet high. You can lie directly underneath the arch to get a sense of its proportions (this makes good photos too!).
The main reason to complete this hike and reach Corona Arch during your Utah itinerary has to do with it lying outside Arches National Park. There was seriously nobody there!
Tourists flock to the national parks, of course, but Corona Arch is definitely an underrated trail. We passed a few other hikers along the route, but compared to some of the other trails on our trip, this was one of the quietest and well worth the hike.
After all the hiking and taking an ice cold shower, we decided to head out to Downtown Moab. Which is a cute little one-road town with a bunch of shops and restaurants. We got dinner that night at the Moab Food Truck Park, an outdoor food court with shaded seating. This social hub was a great place to end our first night in Moab. There are a whopping 14 food trucks to choose from at the park, offering everything from Chinese and Italian pizza to Mexican tacos, sushi. You can even wash your dinner down with a snow cone like I did.
Where to stay on Day 5 of your 7 day Utah itinerary: Gravity Haus Moab
Day 6 of Your 7 Day Utah Itinerary: Full Day Exploring Arches National Park
For our last full day of our 7 day Utah itinerary, we knew we had to make the most of Arches National Park. This was a biiiiig day of hiking for us. We started at the Delicate Arch Trail, which is probably the most iconic of the hikes in Arches – Delicate Arch is the one you see in all the social media posts and on travel websites.
The highlight of this 3-mile round trip is definitely Delicate Arch itself! You don’t get your first glimpse of Delicate Arch until right at the end of the trail. Which also means you’ll need to SPRINT to the Arch to get a good view of it without the people. (Although with the “remove people” feature that the iphone has these days, that isn’t really a problem anymore).
Next up is the ~7.7 mile Devil’s Garden Trail. This a much longer hike but one that reveals seven incredible arches along its route. The first part of the trail, to Landscape Arch is pretty easy, but things got a bit tougher after this, which also meant the crowds thinned out.
We knew that 7 miles would be pretty tough for us especially on the last day of our trip so we made it to the Double O Arch (which as you can guess, is a double arch) before turning back. We also drove around to some of the viewpoints inside Arches and walked along the paved trails before exiting around sunset.
Back in Moab, the final dinner of our trip was at Josie Wyatts Grille, a modern steak house that’s also open for breakfast. Along with a delicious burger, we enjoyed a couple of cocktails on the outside terrace, which was a great way to round off our last week in Utah.
Where to stay on Day 6 of your 7 day Utah itinerary: Gravity Haus Moab
Day 7 of Your 7 Day Utah Itinerary: Colorado River Kayaking & Heading Home
Aaaand we made it to the final day of this epic 7 day Utah itinerary!
And like the crazy travelers we are, we actually managed to fit in one last activity before heading back to Salt Lake to catch our flight. Can you guess what it was?? And no it’s not hiking!
Moab sits right along the Colorado River, making it an ideal spot for a rafting adventure! So naturally, we signed up for one. Per usual, we booked the activity through GetYourGuide and joined a group tour on the river. It was an absolute blast. I barely paddled (shoutout to my fiance for doing the heavy lifting), but loved taking pics along the way, soaking in the scenery, and enjoying the ride.
The whole adventure lasted about ~4 hours. Afterwards, we headed straight back to Salt Lake, dropped off the rental car and hopped on our 8pm flight back to SF.
Best Hotels and Places to Stay in Utah
I was considering leaving out this section but couldn’t resist giving you more background on where we stayed! This trip actually took place prior to my full-blown travel blogging days so I didn’t capture as much as I typically would now. But I hope you still find it useful since I know finding clean, quiet, hotels anywhere in the world can be difficult.
So here’s a brief summary of the three places we stayed during my 7 day Utah itinerary. Each hotel was clean, comfortable and super well-located (location is key for me), and I’m happy to recommend all three if you’re looking for somewhere to stay in and around the main national parks.
Autocamp Zion
Cute airstreams with unforgettable views? Yep, that’s basically the entire Autocamp brand for you. And there’s loads of different options at Autocamp Zion. You can stay in idyllic little cabins, permanent tents or airstream suites, each equipped with modern amenities and outdoor space. The resort hosts its own hikes and tours, offers E-bike and mountain bike rentals and tours, and can even take you out canyoning or mountaineering. They very also offer a packaged breakfast option if you’re looking to get up and out nice and early, there’s an onsite General Store and The Kitchen restaurant is the perfect place to return to after a day of hiking, offering breakfast, lunch and dinner, plus a well-stocked bar.
Rooms here typically start at $180/night.
Bryce Canyon Log Cabins
Can you tell I picked the hotels based off two things? Aesthetic and location! And Bryce Canyon Log Cabins definitely delivered on both.
These cozy cabins easily took the top spot out of all the places we stayed. Each cabin came with a comfy queen or king bed, free Wi-Fi, and a private bathroom with both a shower and a bath aka post-hike recovery heaven. We also loved having our own outdoor veranda to chill on, plus communal BBQs if you’re feeling grill-happy. It’s just outside the town of Tropic, so you’re close to all the bars, shops, and restaurants without being right in the middle of it.
Rooms here typically start at $140/night.
Gravity Haus Moab
Gravity Haus Moab is one of the best hotels in Moab and was definitely the most modern out of the three. With sweeping red rock views and a prime downtown Moab location, this resort nails both the scenery and the convenience. The rooms are sleek, spacious, quiet, and clean. (Seriously, what more could you ask for). Sadly we didn’t bring Bagel but it’s good to know that Gravity Haus is also dog-friendly. You can even rent hiking equipment on site and chat with their guides about your trip plans… though I’m willing to bet their Utah itinerary won’t beat mine 😊
Rooms here typically start at $130/night.
The Best 7 Day Utah Itinerary: Final Thoughts
Like I said at the top of this post, the fact that I’m even writing about a domestic destination says a lot. I pretty much only travel internationally or write about California wine country, but Utah? Utah earned its own corner of my heart. This trip reminded me how lucky we are to move our bodies, breathe in fresh air, and witness the unreal beauty that exists right here at home. (Sappy I know but it’s true).
If you’re someone who loves staying active, it’s no question: Utah is one of the best hiking destinations in the U.S. You could easily spend a month here and still not hit every trail or viewpoint. But a 7 day Utah itinerary? That’s the sweet spot. It gives you enough time to explore a few of the top national parks, take on some legit hikes, and still have your evenings to chill.
This 7 day Utah itinerary was such a good reminder to slow down, soak it all in, and appreciate feeling happy and healthy. I don’t know when we’ll be back, but I really hope it’s soon. Until then, I’ll be recommending this 7 day Utah itinerary to everyone who asks.
Are you planning a trip to Utah anytime soon? Did I miss any of the coolest hikes in Utah that I need to tackle next time? Let me know in the comments below!
Visiting other parts of America?
Check out my other travel guides on The United States here.


Comments Off on First-Timer’s Guide to the Perfect 7 Day Utah Itinerary